16 Sitting Yoga Poses to Include in Your Routine for Better Health
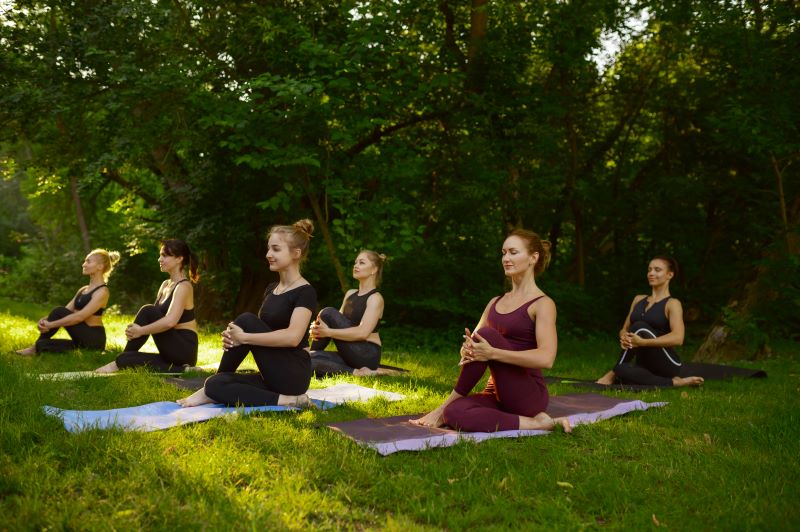
Sitting yoga asanas involve a lower risk of falling and injury. They are ideal for improving flexibility and strength in your lower body and building stamina by toning your abdominal organs. In addition, practising sitting yoga poses daily will help stretch your hamstrings, quads, glutes, back muscles, and calves.
Further, please read this article to learn about these yoga asanas and how they provide greater control over your body.
Top Sitting Yoga Asanas
Seated yoga asanas are fundamental to any comprehensive yoga practice. They are highly versatile and accessible, providing a stable foundation for beginners while offering profound benefits for seasoned practitioners.
Seated yoga poses enhance flexibility, build strength, improve posture, and foster a sense of inner tranquillity. Particularly effective for grounding and centring the mind, they are ideally suited for initiating and concluding a yoga session.
1. Lotus Pose
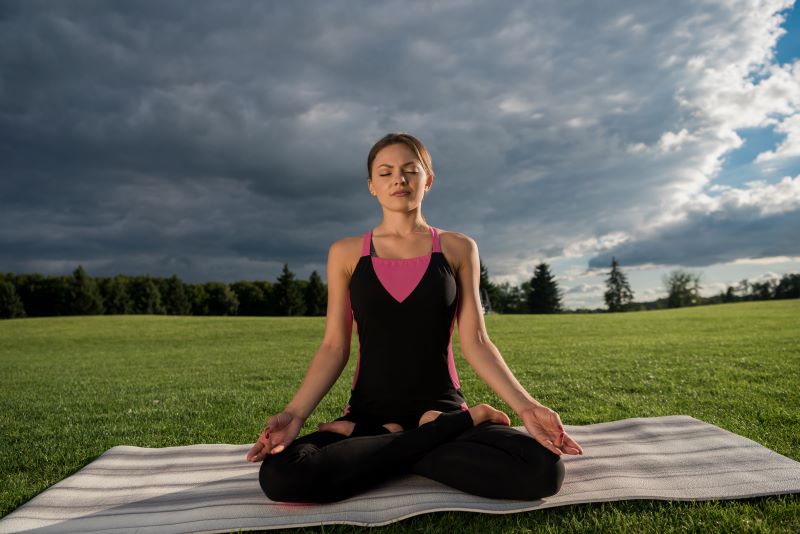
Also known as Padmasana, this yoga pose is extremely beneficial for developing your overall body posture as it stretches your backbone. Additionally, the lotus pose strengthens your bones and joints, relieves you from pains and cramps caused during menstruation, and massages your lower abdomen and pelvic organs.
Yoga Level: Intermediate
How to Do Lotus Pose?
Step 1: Sit on a floor mat and gently stretch your legs in front.
Step 2: Now, slowly bend your right leg and place your right foot on your left thigh.
Step 3: Fold your left leg gently, and holding your left foot, place it on your right thigh.
Step 4: Ensure that both your feet are closer to the navel and the soles of your feet are moved upwards.
Step 5: Now, stretch your arms gently outwards, resting the palms on your knees.
Step 6: Sit straight and maintain this posture for 5 minutes.
What are the Safety Precautions to Take While Performing Lotus Pose?
- Make sure you're warmed up enough to attempt the posture.
- Ensure that your hips, not your knees, are the source of the rotation.
- Bring your heel as close to your sit bone as possible to keep your knee joint locked.
Who Should Avoid Practising Lotus Pose?
- Avoid Padmasana if you have hip issues, low hip flexibility, or knee or ankle injuries.
- People with recent surgery, arthritis, and knee issues should also refrain from it to avoid exacerbations.
- This pose should also be avoided by pregnant women who are further along in their pregnancy or who are experiencing pregnancy-related problems.
2. Psychic Union Pose
Psychic union pose, also known as Yoga Mudrasana, helps revamp your body's flexibility. In addition, it provides increased mobility to your muscles and joints. Further, it helps to stretch several muscles near your hips, knees, thighs, abdomen, ankles, arms, upper chest, and shoulders.
Yoga Level: Advanced
How to Do Psychic Union Pose?
Step 1: Start by sitting in a Padmasana, meaning cross-legged posture.
Step 2: Make a fist with your right hand and move your arm behind the back. Take a deep breath and hold your right hand with your left hand.
Step 3: Bend your torso forward, keeping your spine straight. Exhale slowly.
Step 4: Without exerting much pressure on your body, try to bring your forehead to the floor.
Step 5: Remain in this position for 5 minutes and release.
What are the Safety Precautions to Take While Performing Psychic Union Pose?
- You should be able to comfortably hold the lotus pose (Padmasana) for at least 3-5 minutes before attempting the Psychic union pose.
- It's recommended to warm up and practice preparatory poses before attempting the psychic union pose.
- Practice on an empty stomach, ideally in the morning or 3-5 hours after your last meal.
Who Should Avoid Practising Psychic Union Pose?
- This position should not be performed by anyone who has injuries to their neck, shoulders, hips, knee, pelvic girdle, or ankles.
- Those with back problems resulting from surgery, injuries, or pain should not attempt the psychic union pose.
- It is recommended to avoid surgery on internal organs because it is contraindicated during the period of healing.
3. Spinal Twist Pose
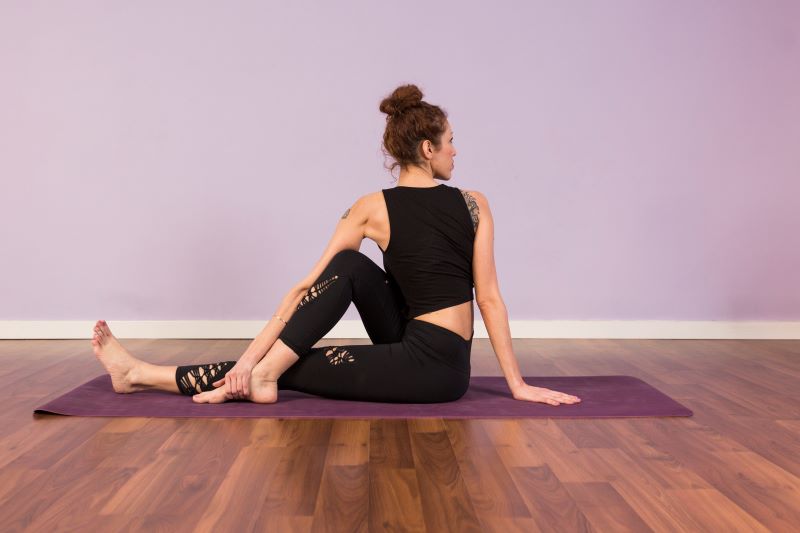
The Spinal Twist Pose or Ardha Matsyendrasana strengthens your back muscles and the spinal column as it increases the elasticity of the spine due to twists and turns. Additionally, this posture enhances your health and stimulates the performance of the kidney, spleen, and bowels.
Yoga Level: Beginner
How to Do Spinal Twist Pose?
Step 1: Start by sitting on the floor mat and stretching your legs.
Step 2: Now, against the inside of the left thigh, slowly bend your right leg and move your right foot close to the anus.
Step 3: Proceed by raising your knee and bending your left leg. Now, place your left foot on the floor, overlapping the right knee.
Step 4: Slowly stretch your right hand and place your palm on the floor mat behind your back.
Step 5: Stretch the left arm over your head and move it gently around your right knee, holding the right ankle.
Step 6: Remain in this posture for 1 minute and breathe evenly.
Step 7: Repeat this pose on the other side.
What are the Safety Precautions to Take While Performing Spinal Twist Pose?
- Before attempting any spinal twist, warm your body with gentle stretches or a few rounds of Sun Salutations.
- Start with a straight and neutral spine. Avoid rounding your back or hunching your shoulders, as these can cause strain and reduce the pose's effectiveness.
- Activate your core muscles to support the spine during the twist. This provides stability and helps protect your lower back.
Who Should Avoid Practising Spinal Twist Pose?
- Those with herniated discs, severe scoliosis, or any acute spinal injuries should avoid spinal twists, as these can exacerbate the condition.
- If you have recently undergone abdominal surgery, twisting poses can strain the healing tissues and impede recovery.
- Deep twisting poses are generally advised against during pregnancy, especially in the later stages, as they can compress the abdomen.
4. Diamond Pose
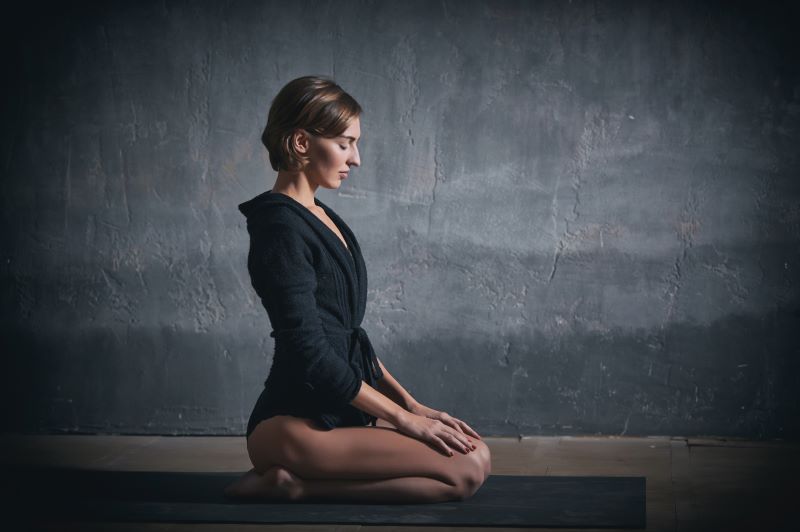
A recent study proved that regularly practising the Diamond Pose of Vajrasana helps reduce hypertension by keeping your mind and body stable. One of the best sitting yoga asanas, it helps treat urinary problems and cure digestive issues. This posture also boosts blood circulation to the lower abdomen and reduces menstrual pain and cramps. Moreover, it strengthens the muscles around this area, allowing you to get relief from chronic back aches and knee pains.
Yoga Level: Beginner
How to Do Diamond Pose?
Step 1: Begin by kneeling comfortably on the yoga mat.
Step 2: Now, gently move your knees and ankles closer and align with your legs. Ensure that the soles of your feet face upwards.
Step 3: Exhale as you sit back on your legs. Ensure that the hips rest on the heels and the thighs on the calves.
Step 4: Place your hands comfortably on your thighs and move your pelvis back and forth slowly to ensure you are comfortable.
Step 5: Inhale and exhale slowly, aiming to sit upright and stretch your spine. Allow your head to move your body upwards, pressing the tailbone to the ground.
Step 6: Now, straighten the head to look forward. Keep the chin parallel to the ground, place your palms on the thigh and relax the arms.
Step 7: Remain in this posture for 5 minutes and then release.
What are the Safety Precautions to Take While Performing Diamond Pose?
- Even though Vajrasana is a gentle pose, it is beneficial to perform a light warm-up to prepare the muscles and joints, particularly if practising after inactivity.
- Keep your spine straight and your shoulders relaxed, and avoid slumping.
- Pay attention to any discomfort or pain, particularly in the knees, ankles, or lower back. If you feel pain, come out of the pose gently.
Who Should Avoid Practising Diamond Pose?
- Pregnant women can practice Vajrasana, but they should keep more space between their knees to avoid putting pressure on their abdomen.
- People with hernias or intestinal problems should only practice Vajrasana under the guidance of an expert yoga instructor.
- People with knee, ankle, or leg injuries or chronic knee problems should avoid this.
5. Easy Pose
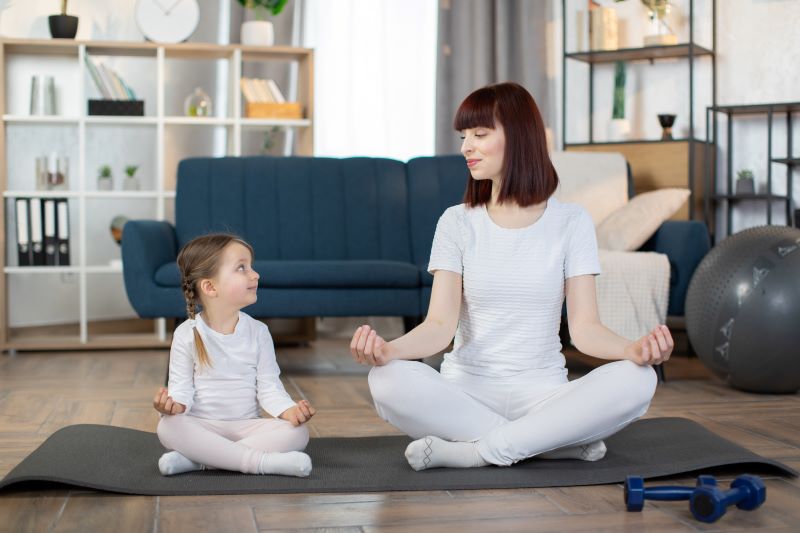
One of the best-seated asanas, Sukhasana, is also known as the Easy, Decent, and Pleasant poses. It overall impacts your mind and body as it reduces stress and discomfort. It improves focus and concentration levels while strengthening your lower abdomen and back muscles. Additionally, Easy Pose enables blood circulation towards your stomach, boosting digestion and allowing nutrient assimilation.
Yoga Level: Beginner
How to Do Easy Pose?
Step 1: Start sitting upright and stretching your leg before your body.
Step 2: Place your left foot under your right thigh and bend your left leg. Again, bend your right leg and move the right foot under your left thigh.
Step 3: Ensure your foot's outer part rests comfortably on the floor. Adjust your body accordingly.
Step 4: Place the palms on your thighs, keeping your spine and shoulders straight. Relax your shoulders a bit and bend the elbows.
Step 5: Close your eyes, inhale gently and relax your entire body.
Step 6: Remain in this position for 5 minutes before interchanging the legs.
What are the Safety Precautions to Take While Performing Easy Pose?
- Sit with your spine straight and shoulders relaxed. Avoid slumping or leaning forward.
- Ensure that your knees are lower than your hips. If your knees are higher, sit on a cushion or folded blanket to elevate your hips and maintain proper alignment.
- Keep your head aligned with your spine, and avoid straining your neck forward or downward.
Who Should Avoid Practising Easy Pose?
- Those with severe knee injuries, arthritis, or chronic knee pain may find sitting cross-legged uncomfortable or harmful.
- Individuals with hip injuries, severe arthritis, or hip replacements should avoid Sukhasana, which requires significant hip flexibility and can strain the hip joints.
- If you have chronic lower back pain or lumbar spine issues, sitting in Sukhasana without proper support can worsen your condition.
6. Monkey Pose
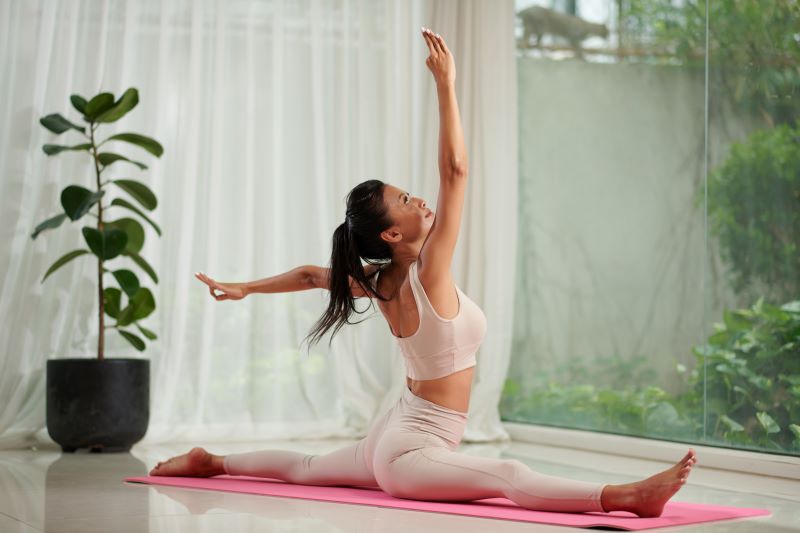
Monkey Pose or Hanumanasana enhances muscle strength, endurance, and flexibility, boosting agility. Further, you will notice relief in your chronic back aches as you consistently practise this yoga posture for eight weeks. In addition, Monkey Pose helps to stretch your groyne muscles, hip flexors, and hamstrings, stretching the quadriceps.
Yoga Level: Advanced
How to Do Monkey Pose?
Step 1: Keep your thighs perpendicular to the ground.
Step 2: Lower your hands to the ground before your knees. Tent them carefully, ensuring you are sitting on your fingertips.
Step 3: Move the right leg before you and place your heels on the floor mat. Now, flex the right foot properly.
Step 4: Move your right foot forward, ensuring your right leg is straight as you extend the left leg straight behind your back.
Step 5: Allow the hips to face forwards. Now, push the toes of the left foot under and hold this posture for 10 minutes. Then, repeat on the other side.
What are the Safety Precautions to Take While Performing Monkey Pose?
- Place yoga blocks under your hands to provide support as you ease into the pose.
- If you cannot reach the full split position, use a bolster or folded blanket under your hips for support.
- Ensure your front knee points directly up and not outward.
Who Should Avoid Practising Monkey Pose?
- Naturally, individuals recuperating from injuries to the coccygeal (tailbone), hip, pelvic, knee, and ankle joints should refrain from this exercise.
- This practice is not recommended for pregnant women as it puts strain on the belly, pelvic and groyne.
7. Cockerel Pose
One of the challenging sitting asanas, the Cockerel Pose, is an advanced-level yoga asana that requires patience and persistence to master. Also known as Kukkudasana, the Cockerel Pose strengthens your upper body and improves your balance and stability. Additionally, it improves digestive function, tones your biceps and triceps, enhances heart health, and reduces extra belly fat.
Yoga Level: Advanced
How to Do Cockerel Pose:
Step 1: Begin by sitting in the Padmasana pose.
Step 2: Place your hands between the thighs and calves, placing your hands downwards.
Step 3: Push through until your palms rest on the floor mat. Place the palms near each other parallelly, allowing the thumbs to touch each other too.
Step 4: Exhale steadily and slowly lift your body off the floor mat. Then, try to balance your body weight on your palms.
Step 5: To maintain better balance, ensure you are breathing evenly.
Step 6: Remain in this posture for 5 minutes and release.
What are the Safety Precautions to Take While Performing Cockerel Pose?
- Before attempting Kukkudasana, warm up your wrists, shoulders, core, and hips with gentle stretches and movements.
- Strengthen and warm up your wrists with exercises like wrist circles and gentle wrist stretches.
- Keep your wrists aligned under your shoulders.
Who Should Avoid Practising Cockerel Pose?
- Those with wrist or shoulder injuries should avoid this pose, which places significant weight and pressure on these areas, potentially exacerbating the injury.
- Individuals with lower back pain, herniated discs, or other spinal issues should avoid or modify this pose to avoid straining the lower back.
- Pregnant women should avoid practising this pose, especially in the later stages of pregnancy, due to the risk of falling and potential strain on the abdominal muscles and pelvic floor.
8. Tortoise Pose
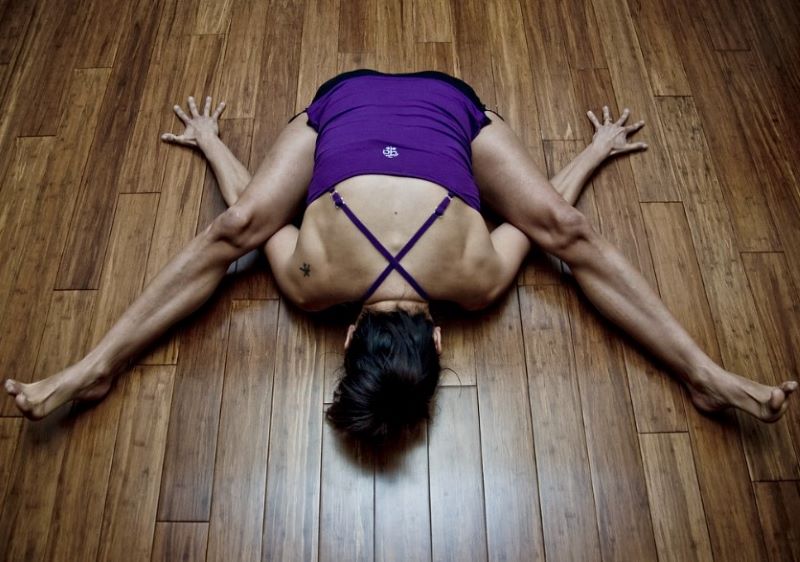
The Tortoise Pose or Kurmasana invokes total body relaxation as your upper body comfortably relaxes on your lower body. This pose involves a lot of stretching and flexing and helps to improve the body flexibility required for practising other yoga postures. Further, it helps to deeply stretch your hamstrings, thighs, hips, backs, shoulders, and chest muscles.
Yoga Level: Intermediate or Advanced
How to Do Tortoise Pose?
Step 1: Sit on the floor, stretch your legs forward, and place them wide.
Step 2: Now, inhale slowly and stretch your arms over your head. Move your knees and bend them.
Step 3: Lower your arms to either side of the body, facing the palms downwards.
Step 4: Point your fingers backwards by turning your wrist. Then, slide your arms slowly beneath the raised knees.
Step 5: Ensure that your torso is parallel to the floor. Now, gently touch your head to the floor.
Step 6: Slowly stretch the legs to straighten your knees. Ensure to inhale and exhale evenly while performing this exercise.
Step 7: Remain in this position for 5 minutes and then release.
What are the Safety Precautions to Take While Performing Tortoise Pose?
- Before attempting Kurmasana, warm your body with gentle stretches and movements, focusing on the hips, hamstrings, and spine.
- Place yoga blocks or blankets under your hips or forehead for support and comfort, especially if you have limited flexibility or experience discomfort in the pose.
- Hip flexibility is crucial for this pose. Practice hip-opening poses regularly to improve flexibility and range of motion.
Who Should Avoid Practising Tortoise Pose?
- If pregnant, speak with your doctor and yoga instructor before attempting the posture. You should also adjust the pose to your comfort level and trimester.
- If you have strained lower back muscles, herniated discs, severe sciatica, or persistent arthritis, avoid this yoga. Kurmasana can worsen the illness and increase discomfort and inflammation in the afflicted areas.
- Regarding injured or irritated muscles and joints, Kurmasana may be more harmful.
9. The Shooting Bow Pose
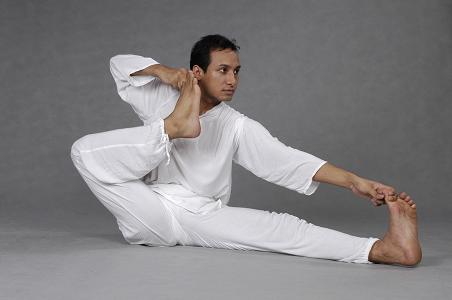
An intermediate posture, the Shooting Bow Pose, also known as Akarna Dhanurasana, has several benefits. It stretches, lengthens, and strengthens the muscles of your abdomen, improving the flexibility of your leg muscles.
Yoga Level: Advanced
How to Do Shooting Bow Pose?
Step 1: Start by sitting on the floor mat and stretching your legs in front of you. Then, move the legs closer together.
Step 2: Now, bend forward gently and stretch the arms to grab your toes.
Step 3: Now, inhale and lift the left leg, moving its foot upwards near your left ear while holding the other leg.
Step 4: Remain in this posture for a few seconds and breathe evenly.
Step 5: Repeat the posture on the other side.
What are the Safety Precautions to Take While Performing Shooting Bow Pose?
- Before attempting the Akarna Dhanurasana, warm your body with gentle stretches and movements, focusing on the hips, thighs, and back.
- Flexible quadriceps and hamstrings are essential for comfortably reaching the foot in the Akarna Dhanurasana.
- If you have difficulty reaching your foot or maintaining balance in the pose, use a yoga strap or belt looped around the foot to assist in the stretch.
Who Should Avoid Practising Shooting Bow Pose?
- This position is not recommended for pregnant people or those with hamstring or shoulder issues.
- Herniated discs, lower back issues, and recent shoulder, arm, spine, or hip surgery should all be avoided.
10. Forward Bend Pose
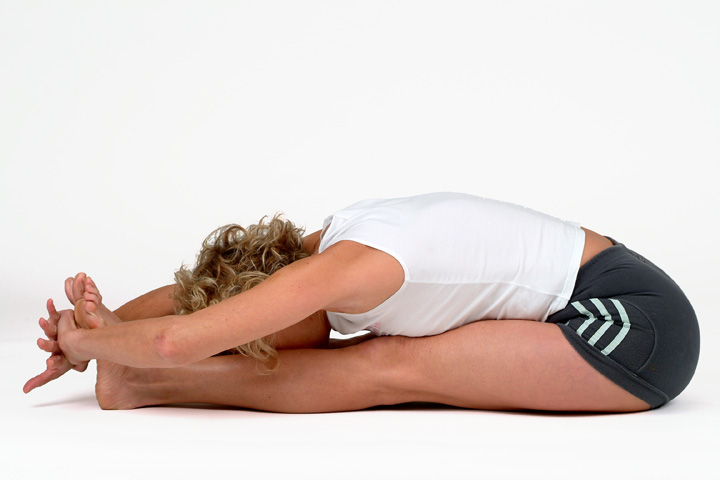
Paschimottanasana, or the Forward Bend Pose, is one of the best asanas for sitting and benefits the health of your abdominal organs. Apart from stimulating your digestive system, liver, kidneys, uterus, and ovaries, it helps you relieve constipation. It is an ideal exercise for the obese and stretches your hamstrings, shoulders, and spine.
Yoga Level: Beginner
How to Do Forward Bend Pose?
Step 1: Sit upright and stretch your legs outwards in front.
Step 2: Inhale gently and stretch the arms above the head. Then, exhale slowly and bend your torso forward.
Step 3: Now, lower the arms and hold your toes. Bend further to reduce the gap between the chest and thighs and allow your forehead to rest on your legs.
Step 4: As you breathe evenly, remain in this posture for about 1 minute before releasing.
Step 5: Inhale slowly and lift your torso. Now, raise the arms over your head and relax them before lowering them.
What are the Safety Precautions to Take While Performing Forward Bend Pose?
- Before attempting the Paschimottanasana, warm your body with gentle stretches and movements, particularly focusing on the hamstrings, lower back, and hips.
- Maintain a straight spine as you fold forward. Avoid rounding or overarching your back excessively.
- If you're a beginner or have limited flexibility, start with a slight bend in the knees and gradually work towards straightening them as your flexibility improves.
Who Should Avoid Practising Forward Bend Pose?
- People with recent abdominal surgery slipped discs, stomach ulcers, diarrhoea, or back and abdomen pain should avoid this pose.
- Pregnant women should also avoid this pose.
11. Head to Knee Pose
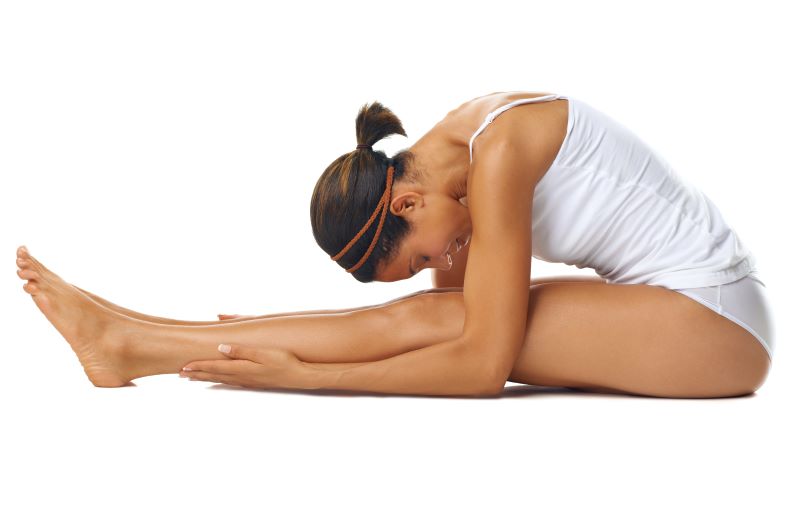
Janu Shirshasana, or Head to Knee Pose, is an excellent therapeutic posture that calms your brain and relieves you from stress and anxiety. It also releases the stiffness in muscles and provides you with a toned body.
Yoga Level: Advanced
How to Do Head-to-Knee Pose?
Step 1: Start by sitting upright and stretching the legs in front of you.
Step 2: Bend the left leg near your knee so that your calf remains against the ground.
Step 3: Turn down the left foot alongside the floor, pressing your heels to the inner side of the right thigh.
Step 4: Bend forward and hold the outstretched right foot with both hands. During this posture, keep your chin and head high.
Step 5: Exhale slowly and bend your lower abdomen at the waist, comfortably placing the forehead on your right knee.
Step 6: Breathe deeply and remain in this posture for over a minute. Release the right leg and return to the upright posture as you stay seated.
Step 7: Repeat this posture with the other leg.
What are the safety precautions to take while performing head-to-knee poses?
- Before attempting this pose, warm your body with gentle stretches and movements, particularly focusing on the hamstrings, hips, and lower back.
- Maintain a straight spine as you fold forward. Avoid rounding or overarching your back excessively.
- Keep both hips grounded on the mat. If your hips lift off the ground, sit on a folded blanket or cushion for support.
Who Should Avoid Practising Head-to-Knee Pose?
- Avoid this pose if you are injured in your knees or back.
- If you have asthma or diarrhoea, it is advisable to avoid doing Janu Sirsasana.
- People with lumbar disc herniation or serious lower back ailments should not perform this pose.
12. Leg Over Shoulder Pose
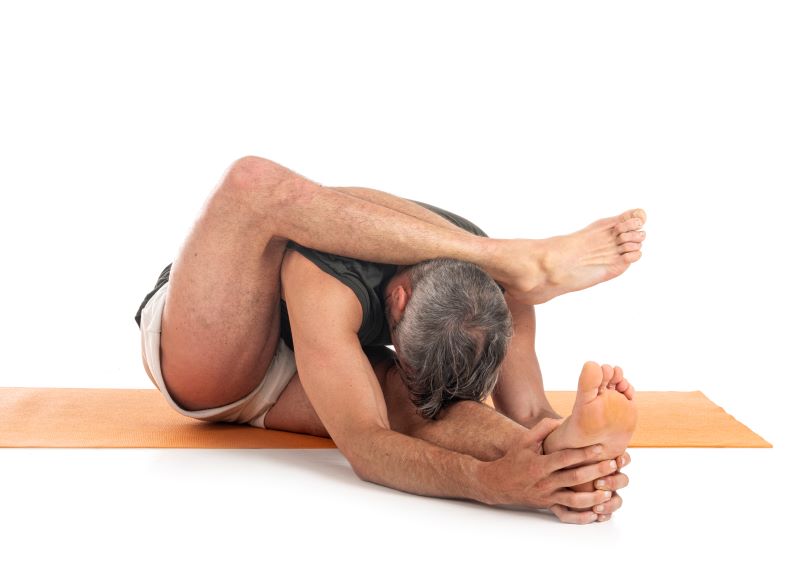
Eka Pada Shirshasana, or Leg Over Shoulder Pose, is a complex posture in the list of sitting yoga asanas that benefit the lumbar and thoracic areas. It improves flexibility as it releases stiffness. Further, it lengthens the hamstrings, glutes, and psoas, gradually increasing mobility and body balance and strengthening the muscles in the lower abdomen.
Yoga Level: Advanced
How to Do Leg Over Shoulder Pose?
Step 1: Begin by sitting cross-legged on the floor.
Step 2: With both hands, hold the right foot, pulling the sole upwards and closer to your chest.
Step 3: Raise the foot to your nose level and then move it slowly to your forehead.
Step 4: Move your head forward to place the right leg onto your right shoulder.
Step 5: Move the leg further, aligning your toes with the backside of your head.
Step 6: Move the arms closer to the level of your chest in a prayer position and maintain the posture for a few minutes.
Step 7: Repeat this pose with the other leg.
What are the Safety Precautions to Take While Performing Leg Over Shoulder Pose?
- Before attempting this pose, warm your body with gentle stretches and movements, particularly focusing on the hips, hamstrings, and spine.
- Regular practice of hip-opening and hamstring-stretching poses is essential to gradually preparing the body for this pose.
- Maintain a straight spine throughout the pose to avoid compressing the vertebrae. Engage the core muscles to support the spine.
Who Should Avoid Practising Leg Over Shoulder Pose?
- People with limited hip, hamstring, or spine flexibility should avoid attempting this pose. Pushing the leg behind the head can lead to strain or injury.
- People with lower back pain, herniated discs, or other spinal issues should avoid this asana.
13. Staff/Stick Pose
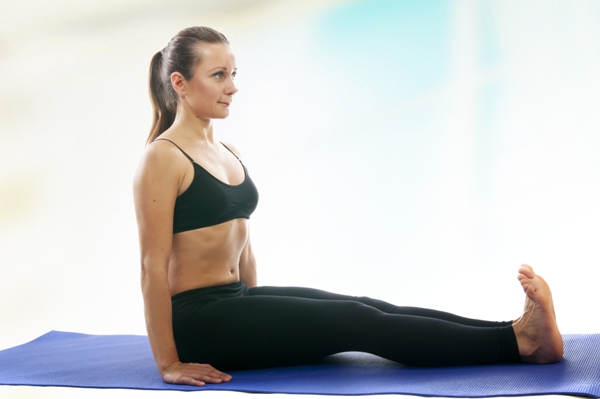
Dandasana, or Staff Pose, is an excellent yoga asana that helps strengthen the core muscles, improving posture and stamina. Additionally, it stretches the hamstrings and spine, increasing body flexibility.
Yoga Level: Beginner
How to Do Leg Staff/Stick Pose?
Step 1: Begin by sitting upright, extending the legs in front of you.
Step 2: Flex your feet by slowly engaging the thigh muscles. Try to bend your knees to keep them grounded.
Step 3: Move your shoulders and align it with the hips. Now, try to move the shoulder away from your ears.
Step 4: Straighten the arms and keep the palms on the floor to either side of your hips, ensuring support to your spine.
Step 5: Inhale slowly and stretch your spine.
Step 6: Remain in this position for 5 minutes and release.
What are the Safety Precautions to Take While Performing Staff/Stick Pose?
- Choose a firm surface, such as a yoga mat or blanket, to sit on. Avoid practising Dandasana on a soft or uneven surface, as it may compromise your stability and alignment.
- Sit tall with your spine straight and elongated from the base of the spine to the crown of the head. Engage your core muscles to support the lengthening of the spine.
- Roll your shoulders back and down, away from your ears, to open up the chest and broaden the collarbones.
Who Should Avoid Practising Staff/Stick Pose?
- People should avoid Dandasana, which has a weak core and stiff hamstrings.
- Pregnant women in the late stages of pregnancy may find it uncomfortable or difficult to sit in Dandasana due to the pressure on the abdomen and reduced mobility. Individuals with uncontrolled high blood pressure should approach this pose cautiously, as sitting upright for an extended period can increase blood pressure.
- Individuals with uncontrolled high blood pressure should approach Dandasana cautiously, as sitting upright for an extended period can increase blood pressure
14. Bound Angle Pose
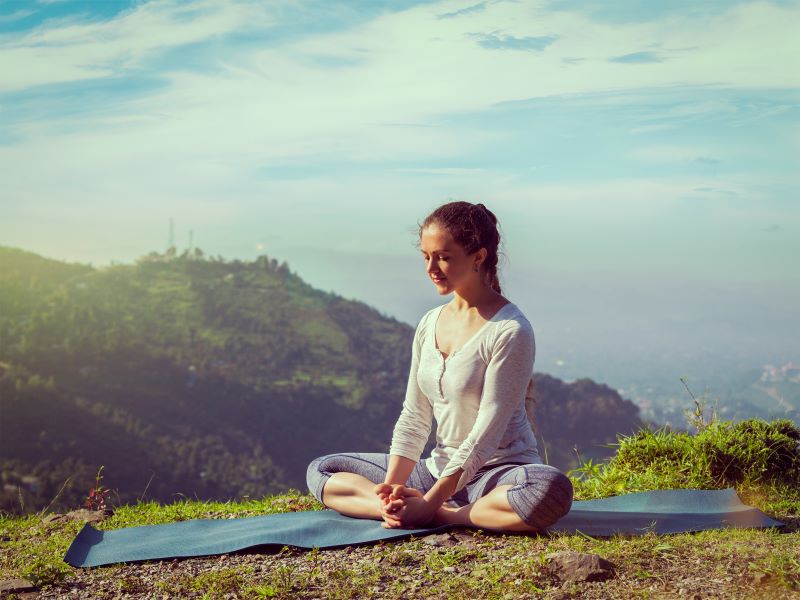
Baddha Konasana, or Bound Angle Pose, is an excellent posture to open your hips and stretch the inner shin muscles. It is a very simple posture that improves your body posture by strengthening the core and stimulating the back muscles as you stretch your spine.
Yoga Level: Beginner
How to Do Bound Angle Pose?
Step 1: Start by sitting in Staff Pose.
Step 2: Slowly bend your knees, allowing them to rest to the sides.
Step 3: Move the soles of your feet closer and use your hands to open them as you flap the pages of any book.
Step 4: Slowly press the shoulder blades against your upper back. Try to lift via chest or sternum and hold your ankles to raise them properly.
Step 5: Remain in this pose for 5 minutes and release.
What are the Safety Precautions to Take While Performing Bound Angle Pose?
- Begin with gentle warm-up exercises to prepare your body for the pose. Focus on opening the hips and stretching the inner thighs.
- Be mindful of your knees. If you feel any discomfort or strain in your knees, use props like blankets or blocks under them for support.
- Approach this pose gradually. Avoid forcing your knees towards the ground or pushing beyond your limits.
Who Should Avoid Practising Bound Angle Pose?
- This should not be done if there is a neck, hip, or knee injury.
- An individual experiencing severe sciatica. This yoga pose may cause discomfort in severe circumstances even though it relieves the nerves. It is also difficult to perform.
- It would be difficult for someone with lower back discomfort to lie down in a supine posture. Thus, ensure that the same is supported.
15. Cow Face Pose
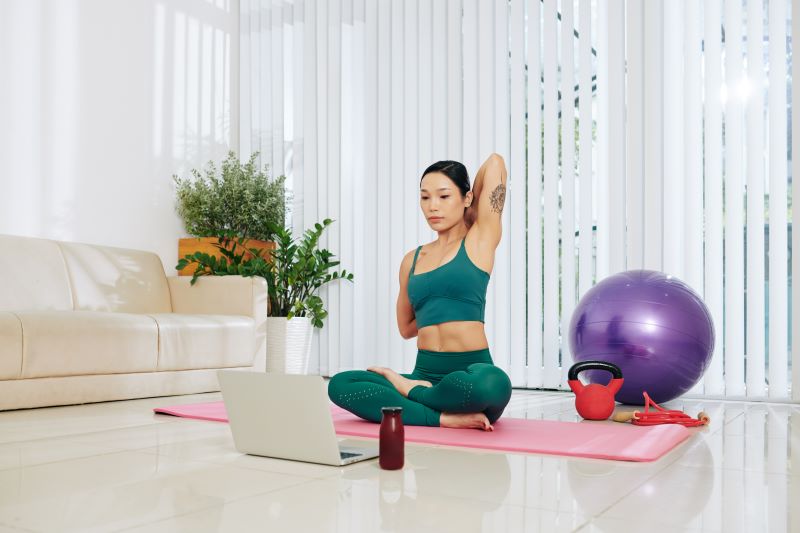
Gomukhasana, or the Cow Face Pose, stretches and strengthens the muscles around your chest, shoulders, ankles, and knees. This further improves the body posture, and since all the joints operate while you practice this asana, it stimulates blood circulation.
Yoga Level: Beginner
How to Do Cow Face Pose?
Step 1: Sit upright on the floor, stretching your legs to your front in the Dandasana position.
Step 2: Slowly bend your left leg, gently placing it underneath your right hips. Bring your right leg onto your left thigh.
Step 3: Move both your knees closer. Place the heels at an equal distance from your hips, keeping the right heel closer to your left hip.
Step 4: Move your feet away from one another and return to sit evenly between your sitting bones.
Step 5: Inhale deeply, bending your left elbow. Bring your left arm towards the back of your neck, fold your arm upwards, and place the palm outwards.
Step 6: Stretch your right hand to ride, bend your elbow, moving your arm towards the backside.
Step 7: Stretch the right arm, allowing it to reach your left hand. Remain in this posture for 5 minutes and repeat on the other side.
What are the Safety Precautions to Take While Performing Cow Face Pose?
- Before attempting the Gomukhasana, warm up your body with gentle stretches and movements, particularly focusing on the hips, thighs, shoulders, and chest.
- Gomukhasana requires flexibility in the hips, thighs, and shoulders. Regular practice of hip-opening and shoulder-opening poses is essential to gradually preparing the body for this pose.
- Sit tall with your spine straight and elongated. Engage your core muscles to support the lengthening of the spine.
Who Should Avoid Practising Cow Face Pose?
- Avoiding the posture is particularly advised for those who are physically frail or have just had surgery.
- Those with lower back pain or tight hips can perform the position while sitting on a pillow or blanket for hip support.
16. Pigeon Pose
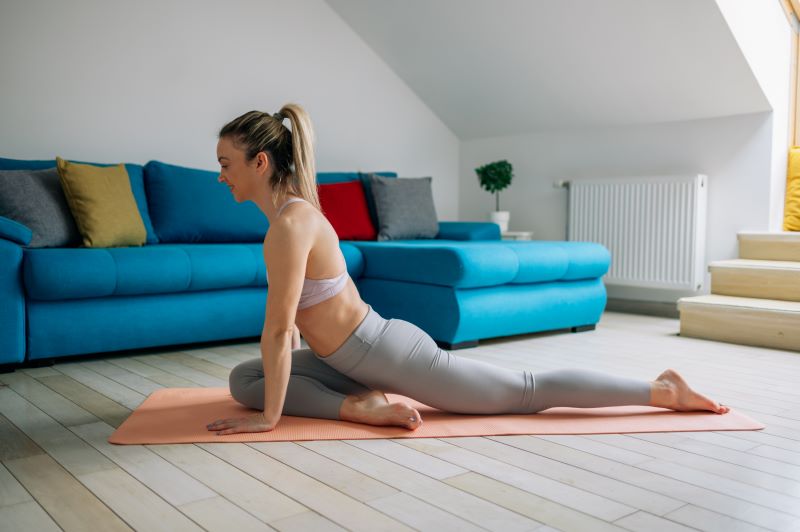
A yoga asana (pose or stance) that opens your hips and relieves lower back discomfort is called pigeon pose. Even though it's a fantastic way to lengthen your muscles and improve flexibility, executing the exercise correctly is crucial to avoid strain or damage.
Yoga Level: Intermediate
How to Do Pigeon Pose?
Step 1: Sit upright on the floor, stretching your legs to your front in the Dandasana position.
Step 2: Slowly bend your left leg, gently placing it underneath your right hips. Bring your right leg onto your left thigh.
Step 3: Move both your knees closer. Place the heels at an equal distance from your hips, keeping the right heel closer to your left hip.
Step 4: Move your feet away from one another and return to sit evenly between your sitting bones.
Step 5: Inhale deeply, bending your left elbow. Bring your left arm towards the back of your neck, fold your arm upwards, and place the palm outwards.
Step 6: Stretch your right hand to ride, bend your elbow, moving your arm towards the backside.
Step 7: Stretch the right arm, allowing it to reach your left hand. Remain in this posture for 5 minutes and repeat on the other side.
What are the Safety Precautions to Take While Performing Pigeon Pose?
- Avoid pigeon pose if you have knee or hip injuries or experience ongoing pain.
- Keep your hips stacked and avoid twisting your sacrum by evenly distributing weight.
- If needed, use props like blocks or blankets to elevate your hips, and keep your front foot flexed (toes curled under) for some variations.
Who Should Avoid Practising Pigeon Pose?
- People with injuries in their knees, hips, or lower back.
- Pregnant women, especially in later stages.
- Those lacking core strength or limited hip mobility (modify or skip).
- Anyone experiencing pain during the pose (stop and consult a doctor if needed).
Benefits of Doing Sitting Yoga Poses Daily
Sitting yoga poses, accessible almost anywhere, offer a range of benefits for your body and mind:
- Improved Flexibility: Sitting yoga poses gently stretch the hips, legs, and lower back muscles, enhancing overall flexibility. Regular practice helps to increase your range of motion and reduce stiffness.
- Enhanced Posture: These poses encourage a straight spine and proper alignment, helping to improve posture. Good posture reduces strain on the spine and prevents back pain.
- Strengthened Core and Back Muscles: Many sitting poses engage the core and back muscles, building strength and stability in these crucial areas. This can help prevent injuries and improve overall physical performance.
- Better Digestion: Certain sitting poses stimulate the digestive organs, promoting better digestion and alleviating bloating and constipation. Practising these poses after meals can be particularly beneficial.
- Reduced Stress and Anxiety: Daily practice of sitting yoga poses encourages relaxation and deep breathing, which can significantly reduce stress and anxiety levels. These poses help activate the parasympathetic nervous system, promoting a state of calm and relaxation.
- Enhanced Mental Clarity and Focus: Sitting yoga poses often involve meditation or mindfulness, which can improve mental clarity and concentration. Regular practice helps to calm the mind and enhance cognitive functions.
- Increased Circulation: Sitting yoga poses promote movement and stretching and improve blood circulation. This can help deliver oxygen and nutrients to the cells more efficiently and improve overall health.
- Balanced Energy Levels: These poses help to balance the body’s energy, promoting a sense of harmony and well-being. This can lead to more stable energy levels throughout the day, preventing fatigue and enhancing productivity.
Sitting yoga poses offer numerous benefits for both the body and mind. They promote inner calm and relaxation, stretch and strengthen various muscle groups, improve posture, and enhance mental clarity and focus.
Accessible to most people, sitting yoga poses provide a solid foundation for a regular yoga practice. They help reduce stress, improve flexibility, and foster a sense of inner peace. Incorporating these poses into your routine can significantly enhance your health and well-being.


