12 Yoga Poses to Do While Lying on Your Back
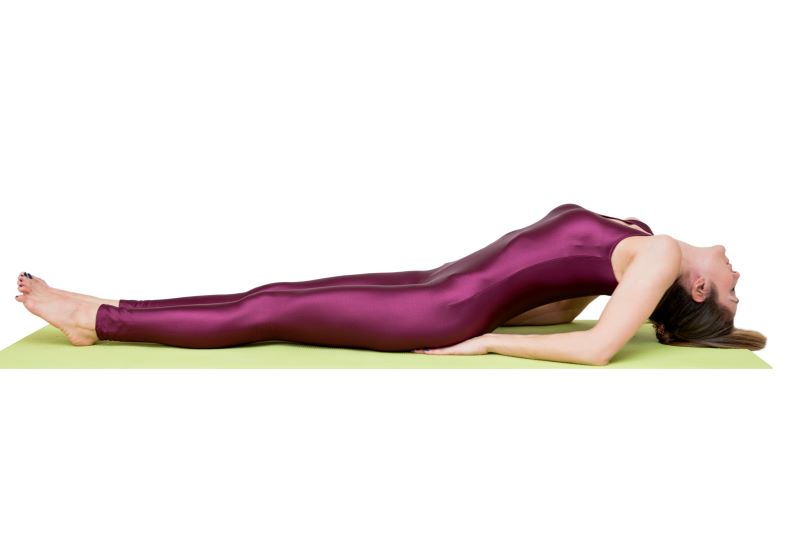
Yoga is not a physical performance of postures but a way to bring about balance. While some poses can be taxing, some, like reclining yoga poses, are quite relaxing. These postures are effective and introduce us to proper body alignment. Further, they help us develop flexibility and afford us space to concentrate on breathing to relax the mind.
The next segments will discuss the 12 best reclining yoga asanas, how to do them, safety precautions and contraindications.

Table of Contents

-
-
Ananda Balasana (The Happy Baby Pose)
-
Bhujangasana (The Cobra Pose)
-
Dhanurasana (The Bow Pose)
-
Halasana (The Plough Pose)
-
Matsyasana (The Fish Pose)
-
Pavanamuktasana (The Wind-Releasing Pose)
-
Salabhasana (The Locust Pose)
-
Sarvangasana (The Shoulder Stand)
-
Savasana (The Corpse Pose)
-
Setubandha Sarvangasana (The Bridge Pose)
-
Supta Matsyendrasana (Supine Spinal Twist)
-
Supta Baddha Konasana (Reclining Bound Angle Pose)
-
-
-
Top Reclining Yoga Poses
Laying or supine poses (Sanskrit meaning 'Supta') are used in restorative yoga. They are beneficial for relieving stress and tension in the shoulders, neck and back. Further, as your body weight is positioned with a low centre of gravity in laying yoga poses, they will deepen reclined twists, strengthening your back and promoting flexibility in your legs.
Read along to learn how to perform each reclining posture to utilise maximum benefits accurately.
1. Ananda Balasana - The Happy Baby Pose
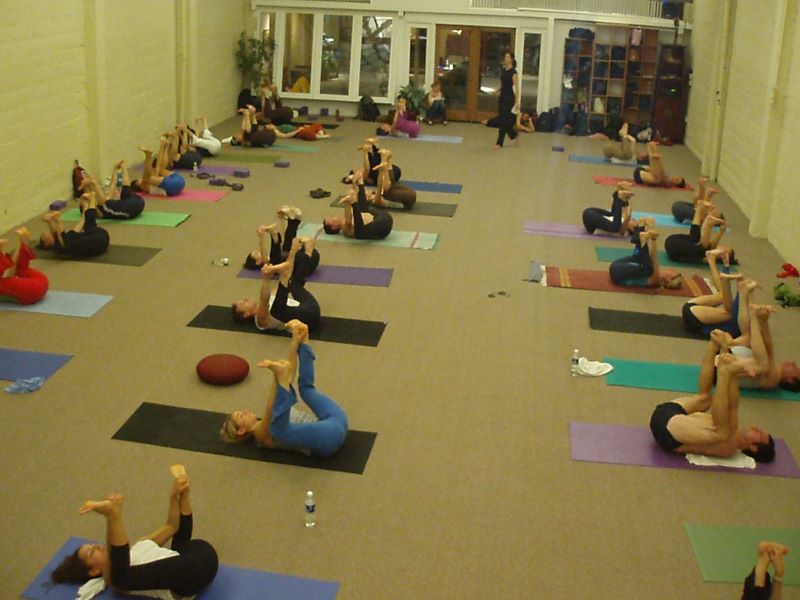
The happy baby pose stretches the hamstrings, inner thighs, and groins and relaxes the back and hips, significantly improving overall flexibility and mobility. In addition, Ananda Balasana relieves stress and anxiety, regulates heart rate, and re-aligns the spine.
Yoga Level: Beginner
How to Do Ananda Balasana?
Step 1: Place a mat on the floor and lie flat on it on your back. Ensure that you find a neutral spine position to maintain your spine's natural curves.
Step 2: Bring your knees toward your chest, making a 90-degree angle. You need to keep your hip sockets loose to bring your legs up, but the hips should stay down. Try to maintain a neutral spine with your tailbone on the mat.
Step 3: Flex your feet while the soles of your feet face towards the ceiling.
Step 4: Reach forward to hold your feet. Then, spread your knees apart and shift them toward your armpits. Take time and breathe deep to enjoy the stretch in your hamstrings.
Step 5: Flex your heels into your hand and gently rock from side to side to imitate a happy baby. Repeat the set for several breaths.
What are the Safety Precautions to Take While Performing Ananda Balasana?
- Keep your lower back and sacrum flat on the mat to avoid straining your lower back.
- Hold your feet gently. Avoid pulling too hard to prevent overstretching your hips and inner thighs.
- Maintain a steady and relaxed breathing pattern throughout the pose.
Who Should Avoid Practising Ananda Balasana?
- Avoid this position if you have a neck or knee injury or are recuperating.
- After the first trimester, avoid this stance as it may impact the fetus's blood circulation.
- Avoid this posture if you have recently undergone stomach surgery or surgery near your hips or knees.
2. Bhujangasana - The Cobra Pose
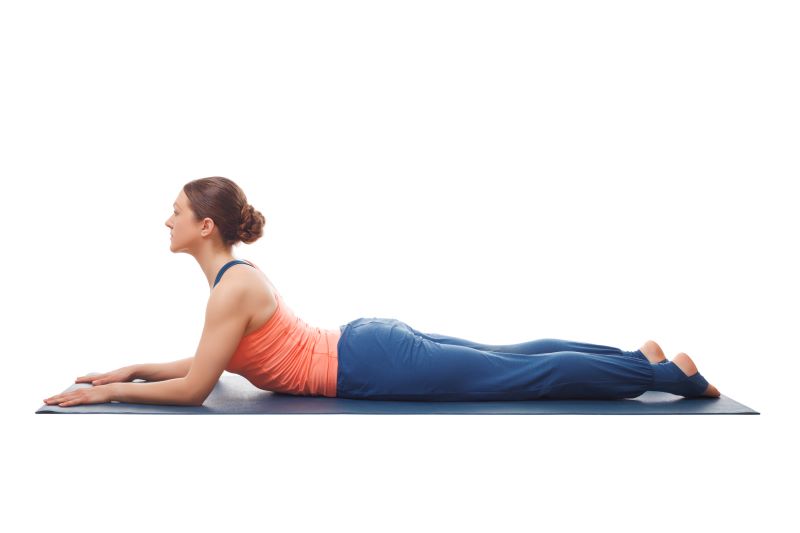
You can include the cobra posture for the Sun Salutation. Further, if your work requires sitting for longer hours, performing Bhujangasana will significantly improve your spinal mobility, relieve back pain, and strengthen the muscles of the region. This yoga asana is also beneficial in reducing symptoms of mild depression.
Yoga Level: Beginner/Intermediate
How to Do Bhujangasana?
Step 1: Place a mat and lie down on your stomach.
Step 2: Inhale and raise your torso and head with your palms supporting you. Then, bend your arms toward your elbows.
Step 3: Gently arch your neck and try to look upward slowly. Ensure you press your stomach on the mat.
Step 4: Press your toes onto the flow and try to extend them out fully to imitate the cobra pose. Hold the posture for 5 seconds and repeat.
What are the Safety Precautions to Take While Performing Bhujangasana?
- Ensure your body is warmed up before performing Bhujangasana to prevent muscle strain.
- Keep your elbows close to your body and shoulders away from your ears, and evenly distribute the weight along the spine.
- Engage your back muscles rather than pushing up with your hands to avoid overstraining your lower back.
Who Should Avoid Practising Bhujangasana?
- Pregnant women should void because the foetus may suffer as a result of the pose's pressure on the abdomen and pelvis.
- Avoid placing too much weight on your hands in this pose, as this can cause numbness, tingling, or weakening in your hands and wrists. Instead, try practising different stances or adjusting the pose with props.
- Avoid the pose if you have neck or spinal pain, such as spondylitis
3. Dhanurasana - The Bow Pose
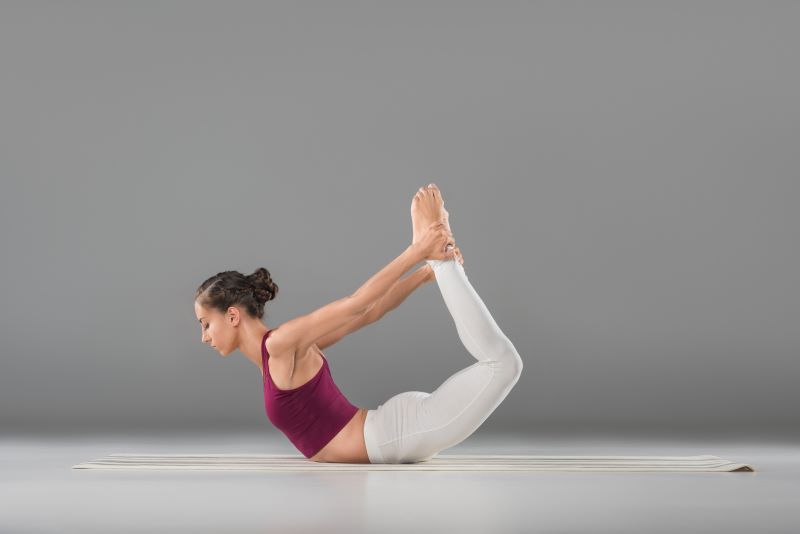
This reclining asana is one of the 12 basic Hatha asanas similar to backbend poses. You can perform this posture by stretching your back within a sequence of deep back stretches. Dhanurasana focuses on the spinal column, helps release stiffness in the neck, shoulders, and abdomen, and improves posture. Moreover, it significantly enhances flexibility and encourages balance in the chest and core.
Yoga Level: Intermediate/Advanced
How to Do Dhanurasana?
Step 1: Lie with your stomach on the floor or a mat. Align your feet with your hips and your arms by the side of your body.
Step 2: Now fold your knees and bring your hands back to hold your ankles.
Step 3: Inhale and lift your chest off the ground. Then, pull your legs up toward your back. Look straight and hold the taut or bow-like posture.
Step 4: Take deep breaths when you are comfortable in the pose. Avoid overdoing the stretch.
Step 5: Exhale and gently release your ankles. Then, bring your chest and legs back to the ground and relax.
What are the Safety Precautions to Take While Performing Dhanurasana?
- Keep your knees hip-width apart to avoid compressing the lower back.
- Align your shoulders and keep them away from your ears.
- Actively press your feet into your hands to lift your chest and thighs off the floor, distributing the effort evenly.
Who Should Avoid Practising Dhanurasana?
- Avoid practising this asana during pregnancy as the weight shifts to the stomach.
- Individuals with high blood pressure levels, hernias or who have recently undergone abdominal surgery must refrain from performing this reclining yoga asana.
- If you have neck and back pain or injury, consult a professional to confirm whether you can perform the posture.
4. Halasana - The Plough Pose
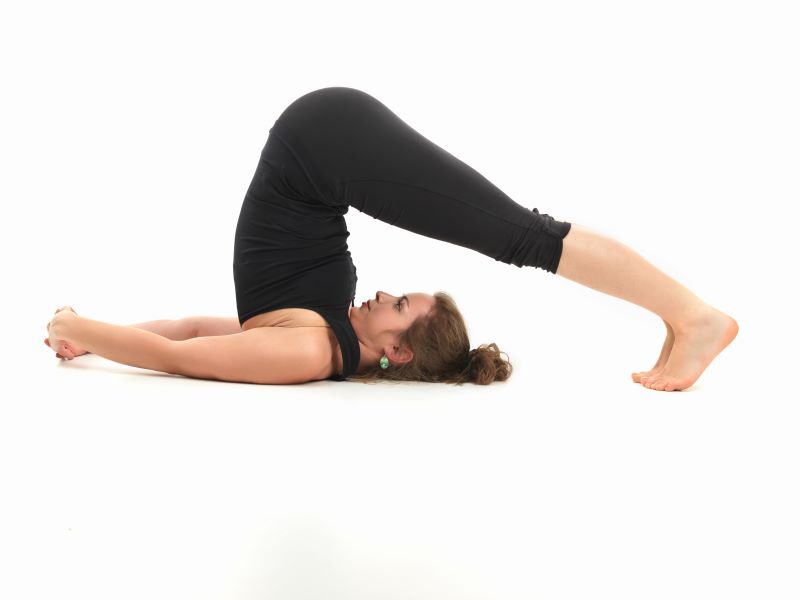
Halasana primarily boosts circulation and regulates optimum blood pressure levels. This also helps lower blood sugar levels and is effective for diabetes management. In addition, it relieves muscle tension, making your spine more flexible and promotes joint mobility. Further, it is highly beneficial to cure constipation.
Yoga Level: Intermediate/Advanced
How to Do Halasana?
Step 1: Lie on your back on a mat or the ground. Keep your arms by the side of your body, palms facing the floor.
Step 2: Breathe in and lift your legs to 90 degrees. Then, exhale, roll your pelvis off the mat and move your legs back toward your head. Now, gently lower your legs over the head toward the mat.
Step 3: Place your hands on your lower back and try to align your little finger, pointing toward the ceiling, on either side of your body.
Step 4: Bring your hands up your spine and elevate them. Now, place your shoulder blades and elbows as close as possible. Next, you can either release your arms by the side of your body with palms down or interlace the fingers.
Step 5: Hold this pose for 2 minutes. Then, exhale, bring your spine back to the mat and pause your legs at 90 degrees.
Step 6: Exhale and gently involve your abdominals to lower your legs on the mat. Relax and repeat to complete the set.
What are the Safety Precautions to Take While Performing Halasana?
- Keep your shoulders firmly on the ground to support your upper body.
- Use your abdominal muscles to lift your legs and support your lower back, reducing strain on your spine.
- Do not force your feet to the ground if your flexibility does not allow it.
Who Should Avoid Practising Halasana?
- Refrain from practising this yoga pose if you are suffering from conditions such as glaucoma and dental bone grafts.
- Avoid the plough pose if you suffer from shoulder, neck or back injuries or chronic pain.
5. Matsyasana - The Fish Pose
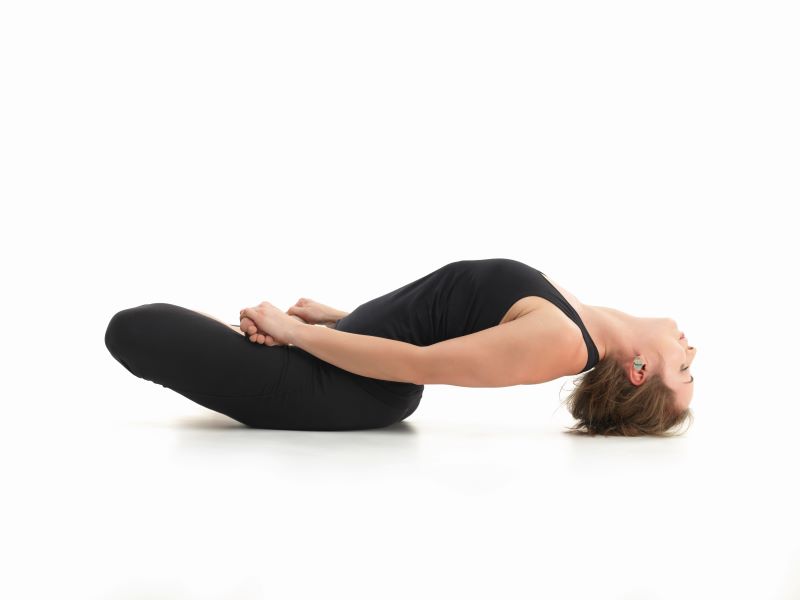
If you want to perform some reclining yoga poses to attain the ultimate mind and body balance, go for the fish pose or Matsyasana. It stretches and engages the front portion of the body, like the abs, chest, neck, hip flexors and back. Further, in terms of chakra, this posture has several benefits as it stimulates the Vishudda chakra (throat), relating to self-expression and communication and the Sahasrara chakra (crown), which is related to wisdom and knowledge.
Yoga Level: Intermediate
How to Do Matsyasana?
Step 1: Place a mat and lie on it with your back. Bend your elbows with your forearms on the mat and your upper arms perpendicular to the ground.
Step 2: Keep your forearms intact and elevate your chest. To do that, roll your shoulders back and tuck the shoulder blades onto your back. Ensure your body makes a backbend.
Step 3: Now, tuck your hands under your buttocks for stability. Next, lower your head back and try to touch the floor, stretching the throat. Ensure your legs and toes are active.
Step 4: Press into your forearms to raise your head off the mat and release your upper body on the mat. Relax and repeat to complete the set.
What are the Safety Precautions to Take While Performing Matsyasana?
- Ensure your body is warmed with gentle stretches and preparatory poses to prevent muscle strain.
- Avoid placing excessive weight on your head to prevent neck strain.
- Avoid forcing your chest too high, which can cause strain.
Who Should Avoid Practising Matsyasana?
- Avoid Matsyasana if you have a headache.
- This pose is also not recommended if you have any neck or back injury.
6. Pavanamuktasana - The Wind-Releasing Pose
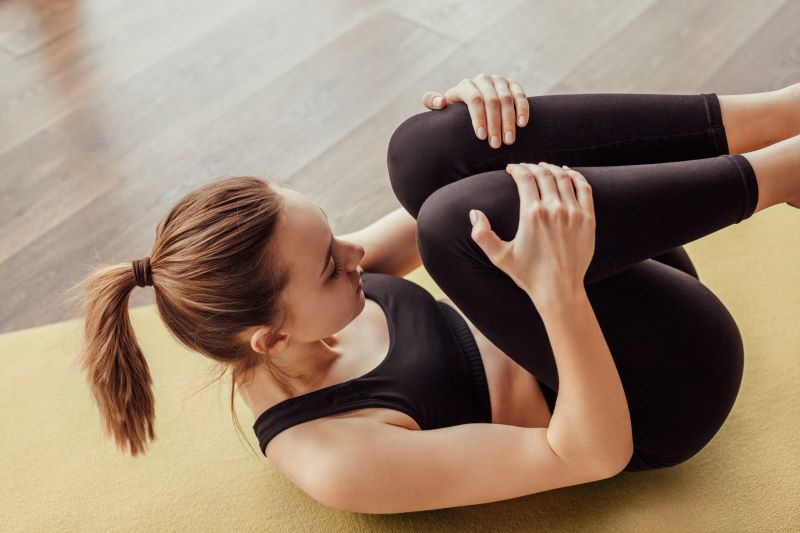
As the name suggests, this reclining yoga pose is an effective way to relieve constipation, promote digestion and regulate bowel movement. Moreover, it is a part of the Padmasana sequence and helps tone up the legs and improve blood circulation in the hip joints to release tension in the lower back. If you are struggling to lose belly fat, practising Pavanmuktasana can be beneficial.
Yoga Level: Beginner
How to Do Pavanamuktasana?
Step 1: Place a mat and lie flat on your back with legs and arms by your sides.
Step 2: Take a deep breath. Now exhale and bring your knees toward you while pressing your thighs on the abdomen.
Step 3: Clasp your hands around your legs and hold the posture. Exhale every time you tighten your hands' grip on the upper shins and exert more pressure on the chest.
Step 4: Every time you inhale, loosen the grip. Then, exhale and release the posture after repeating it 3-5 times. Relax and repeat.
What are the Safety Precautions to Take While Performing Pavanamuktasana?
- Maintain proper alignment of the spine throughout the pose.
- Avoid sudden or jerky movements to prevent strain.
- Coordinate your movements with your breath, inhaling as you lift your legs and exhaling as you bring them closer to your chest.
Who Should Avoid Practising Pavanamuktasana?
- Do not perform this reclining pose if you have heart-related issues or high blood pressure levels.
- Wind-relieving posture is not advised during menstruation or after the second trimester of pregnancy.
7. Salabhasana - The Locust Pose
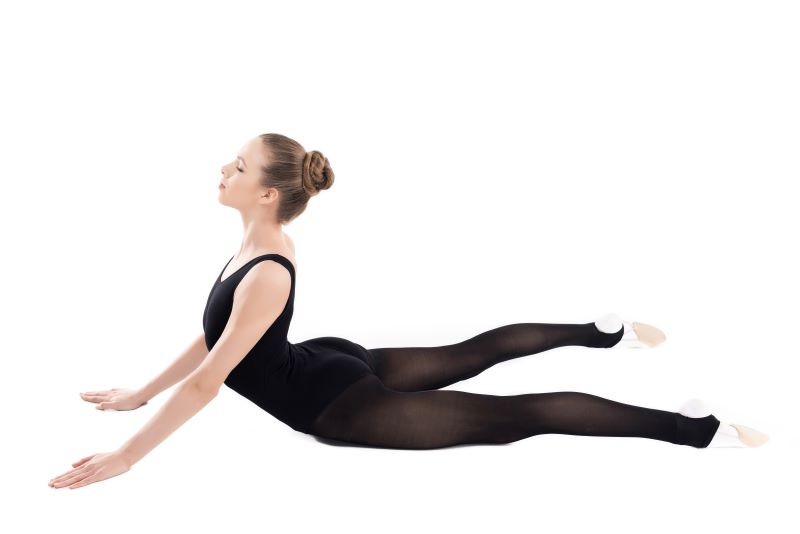
If you are a beginner, prepare for deep backbends with the locust posture. Additionally, you can perform Salabhasana after a Sun Salutation to stretch your spine and open your chest to energise yourself and achieve a better posture. Another benefit of this reclining pose is it significantly improves spinal mobility and counteracts slouching. This also is beneficial for regulating optimal breathing and tone of your hamstrings, gluteus, etc.
Yoga Level: Beginner
How to Do Salabhasana?
Step 1: Place a mat and lie down on your belly with your feet. Draw your hands back with palms down.
Step 2: Extend your big toes straight to activate your quadriceps and press down your toenails.
Step 3: Now rotate your inner thighs facing the ceiling. This will help broaden your lower back.
Step 4: Place your hands on the mat and raise your head, legs and chest with the support of your inner thighs. Draw your shoulders back and up away from the mat. Ensure the back of your neck is extended.
Step 5: You should lift your sternum without taking support of your glutes. Hold the pose and release slowly.
What are the Safety Precautions to Take While Performing Salabhasana?
- Keep your legs straight and engage your thigh muscles to prevent hyperextension of the knees.
- Avoid jerky or sudden movements to prevent injury.
- Stop immediately if you feel sharp pain or discomfort, particularly in your lower back or neck.
Who Should Avoid Practising Salabhasana?
- If you have recently undergone any abdominal surgery or are pregnant, do not practise the locust pose.
- This pose is also not advisable for those who have any neck, shoulder, or back injuries.
8. Sarvangasana - The Shoulder Stand
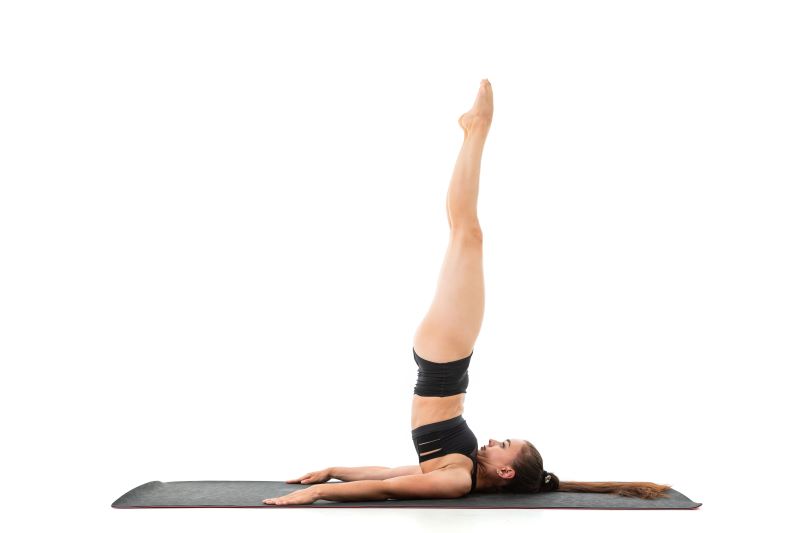
One of the best reclining poses, the shoulder stand, is referred to as the 'Queen of asanas' as it helps maintain physical and mental health. It engages the full body and works on different muscle groups to achieve balance. Sarvangasana is beneficial for aiding back pain and strengthening the spine. It also enhances the functioning of both the male and female reproductive systems.
Yoga Level: Intermediate
How to Do Sarvangasana?
Step 1: Place a mat and lie on your back with your hands by your sides. Now lift your legs, back and buttocks as high as your shoulders. Ensure to support your back with your hands.
Step 2: Draw your elbows close toward each other. Keep your legs and spine straight by pressing your elbows down to the mat. You must keep your hands in the back, and your shoulders and upper arms must support your shoulders.
Step 3: Maintain firm legs and lift your heels higher, facing the ceiling. Next, bring your big toes straight over your nose and point them up. Finally, press your sternum toward your chin, not your neck.
Step 4: Take deep breaths and hold the pose for 30-60 seconds. Slowly lower your knees to the forehead and place your hands on the floor with palms facing down.
Step 5: Ensure you do not lift your head to gently lower your spine, vertebra by vertebra, entirely on the mat. Now, bring your legs down and rest for a minimum of 60 seconds.
What are the Safety Precautions to Take While Performing Sarvangasana?
- Ensure your shoulders are firmly planted on the mat and away from your ears to avoid unnecessary tension.
- Avoid forcing yourself into the pose if you're not ready or if it causes discomfort.
- Avoid holding your breath or breathing shallowly.
Who Should Avoid Practising Sarvangasana?
- Avoid performing the shoulder stand asana during menstruation and pregnancy.
- Individuals with slipped disc, heart conditions, high blood pressure levels, thrombosis, oversized liver, spleen or thyroid gland must avoid Sarvangasana.
9. Savasana - The Corpse Pose
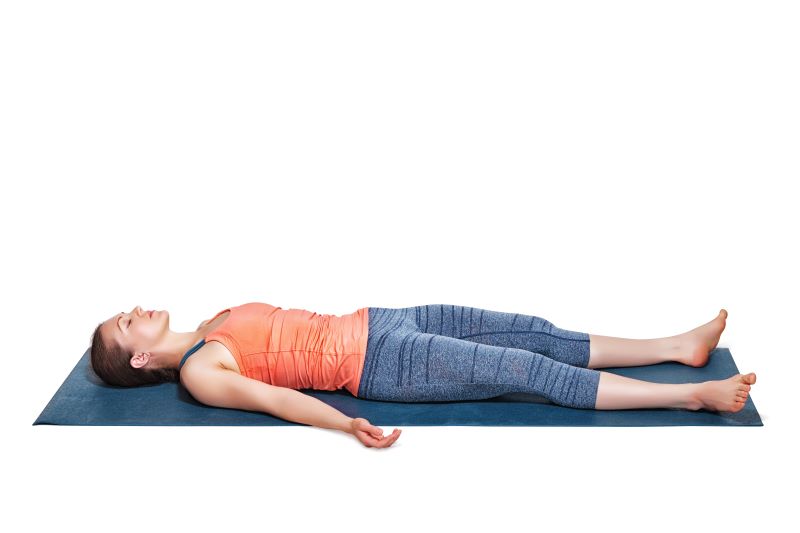
Any yoga session is incomplete without the final relaxation asana, the corpse pose. Though it is one of the easiest reclining yoga poses to get into, it is challenging to balance your mind and body. Savasana demands more focus and concentration on our minds and thoughts. Hence, it helps calm the brain, relieves stress and mild depression, regulates blood pressure levels, and reduces fatigue and insomnia.
Yoga Level: Beginner
How to Do Savasana?
Step 1: Lie down directly on the floor or a mat. Separate your legs and keep them straight. Now, bring your arms by your sides but slightly segregated from your torso. Now turn your palms upside down and let your fingers curl in.
Step 2: Bring your shoulder blades onto your back for support. Once done, do not try to hold your limbs in position. You must relax your entire body and let it feel heavy. Keep breathing normally throughout and try to concentrate.
Step 3: Hold the posture for at least 5-10 minutes. Take deep breaths and wiggle your fingers and toes to reawaken your body. Next, slowly stretch your arms overhead to stretch your full body, from arms to feet.
Step 4: Now close your eyes, draw your knees into your chest and roll over to either side. Use your bottom arm as a pillow and rest in a foetal posture for some time.
Step 5: Come to a sitting position with the support of your arms.
What are the Safety Precautions to Take While Performing Savasana?
- Use a yoga mat or a soft surface to lie on to cushion your body.
- Ensure your body is straight, with your spine in a neutral position.
- Keep your neck in a neutral position. Put a small pillow or folded blanket under your head to support your cervical spine if necessary.
Who Should Avoid Practising Savasana?
- Performing Savasana directly on the floor can be risky in health conditions such as lower back stiffness. Therefore, use a rolled blanket under your knees to ensure a comfortable pelvis position.
- During pregnancy, use a rolled blanket to elevate your chest and head.
10. Setu Bandha Sarvangasana - The Bridge Pose
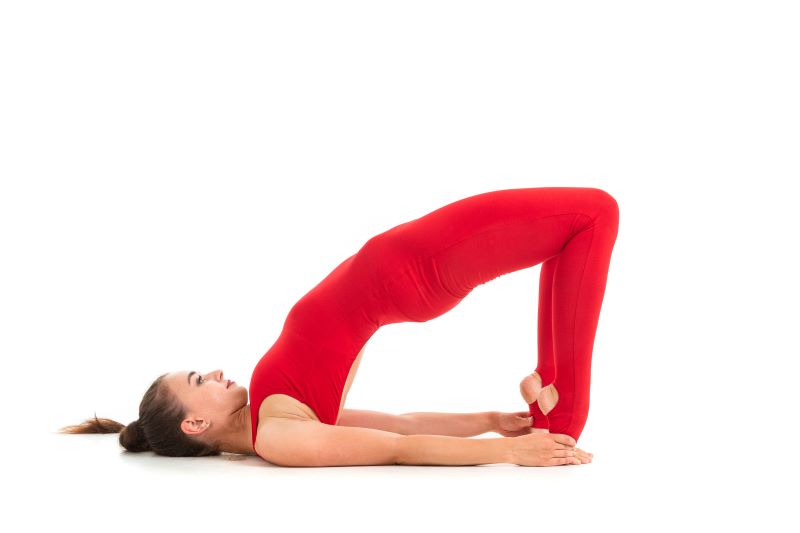
The bridge pose is an effective way to prepare your body and mind for advanced yoga poses. The therapeutic nature of Setubandha Sarvangasana holds back the sympathetic "fight-or-flight" reflex to promote the parasympathetic nervous system. Besides, if you have poor posture, you can also perform this reclining asana to relieve the hunch and boost mobility and flexibility for day-to-day work.
Yoga Level: Beginner
How to Perform Setubandha Sarvangasana?
Step 1: Lie on your back. Then, bend your knees, keeping them at a hip-width distance. Keep your arms by your sides, ankles, and knees in a straight line. Ensure your palms are facing the floor.
Step 2: Take a deep breath and slowly lift your lower first, then the middle and the upper back off the floor. Now roll your shoulders, raise your chest and try to touch the chin without bringing it down.
Step 3: Use your shoulders, arms and feet to support your weight. At this stage, keep your thighs parallel to each other as well as the floor.
Step 4: Take deep breaths, support your back with the back of your palms, and hold the posture for 50-60 seconds. Then, exhale and return to the starting position.
What are the Safety Precautions to Take While Performing Setubandha Sarvangasana?
- Ensure your feet and knees are parallel and do not splay outwards.
- Use your glute and thigh muscles to lift your hips, maintaining control and stability.
- Avoid pushing too hard or lifting too high, which can strain your lower back.
Who Should Avoid Practising Setubandha Sarvangasana?
- Avoid performing this reclining pose if you have knee, shoulder, hip, neck or back issues.
- Setubandha Sarvangasana is a strict no in pregnancy after the first trimester.
11. Supta Matsyendrasana - Supine Spinal Twist
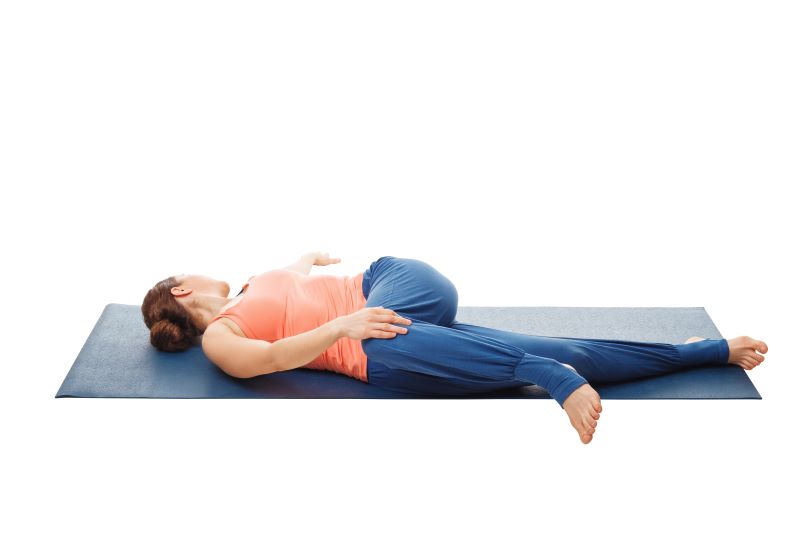
Supta Matsyendrasana, also known as supine spinal twist, is a yoga pose that stretches your spine, glutes, and chest. It improves spinal flexibility, digestion, and posture and is a great way to relax at the end of a yoga session. Regular practice can also help relieve back pain and promote a sense of calm.
Yoga Level: Beginner/Intermediate
How to Perform Supta Matsyendrasana?
Step 1: Put yourself on your back.
Step 2: With your knees bent and pointed upward towards the ceiling, plant the soles of your feet on the ground.
Step 3: Elevate your hips off the ground by pressing into your feet, then move them an inch to the right. This is a crucial step because it positions your hips so that as you move into the twist, they stack on top of each other.
Step 4: After breathing, bring your right knee up to your chest and keep your left leg flat on the ground. Throughout the position, keep your left foot actively flexed. Take a breath.
Step 5: Breathe out, extend your right leg to the left side of your body and cross it over your midline. At this point, your right hip is positioned above your left hip. If you would like, you can hook your right foot behind your left knee.
Step 6: To maintain alignment with your shoulders, extend your right arm to the right. Place your left hand on your right knee or stretch your arms to form a T. Lift your hands and point them upwards.
Step 7: Look over your shoulder to your right fingertips and turn your head to the right. If this step bothers your neck, you can avoid it.
Step 8: Release your right shoulder and left knee to the floor as you exhale.
Step 9: Hold the posture for five to ten breaths. Breathe in, roll onto your back, and bring your right knee into your chest to release the pose. Before moving on to the other side, release both legs to the floor to help your spine become neutral for a few breaths.
What are the Safety Precautions to Take While Performing Supta Matsyendrasana?
- Ensure your body is warmed with gentle stretches or light activity to prevent muscle strain.
- Lie flat on your back with your legs extended and arms resting at your sides.
- Allow your right knee to move towards the floor without forcing it; let gravity assist in the twist.
Who Should Avoid Practising Supta Matsyendrasana?
- The position can be harmful; thus, it's best avoided by those with weak joints or bodies.
- The pose should be avoided by those who have had abdominal surgery since it may put pressure on a sore belly.
- Avoid the posture if you have cervical spondylitis, a herniated disc, a slipped disc, severe back pain, or other spinal problems.
12. Supta Baddha Konasana - Reclining Bound Angle Pose
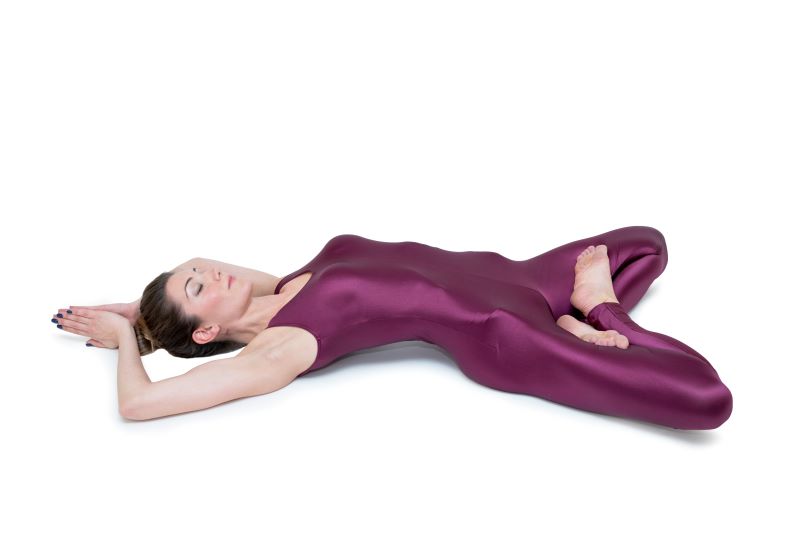
Supta Baddha Konasana, also known as Reclined Bound Angle Pose or Reclined Cobbler's Pose, is a gentle hip opener that stretches your inner thighs, groins, and knees. This restorative pose helps relieve tension in the lower back and can even improve sleep quality by promoting relaxation.
Yoga Level: Beginner/Intermediate
How to Perform Supta Baddha Konasana?
Step 1: Sit up straight with your feet together in a bound angle pose.
Step 2: Breathe out and slowly lower yourself back to the floor, keeping your feet together.
Step 3: Let your knees droop to the sides. Arms down at your sides, palms facing upward.
Step 4: If desired, keep your knees and thighs close to the floor by holding onto your feet or shins.
Step 5: Completely unwind your neck. Shut your eyes and take a few minutes to breathe deeply.
Step 6: As you inhale, bring your knees together. Roll softly to your side by exhaling.
What are the Safety Precautions to Take While Performing Supta Baddha Konasana?
- Begin with gentle stretches or a brief yoga session to warm your body before moving into Supta Baddha Konasana.
- Position your heels close to your pelvis as comfortably as possible without straining.
- Avoid tucking your chin too much; keep it gently lifted.
Who Should Avoid Practising Supta Baddha Konasana?
- Individuals with recent or chronic hip, knee, lower back, or groin injuries should avoid this pose unless advised by a healthcare professional or experienced yoga instructor.
- People with hip replacements or severe knee problems might find this pose uncomfortable or potentially harmful. Modifications or alternative poses are recommended.
Benefits of Doing Reclining Yoga Poses Daily
Daily reclining yoga poses offer a variety of benefits for both your physical and mental well-being:
- Mindfulness and Meditation: Practising reclining poses encourages mindfulness and deep breathing, which can help clear the mind and improve concentration. This can be particularly beneficial for managing anxiety and depression.
- Flexibility: Reclining poses gently stretch muscles, tendons, and ligaments, enhancing overall flexibility. Poses like Supta Baddha Konasanacan specifically target the hamstrings and lower back.
- Spinal Health: Many reclining poses focus on spinal alignment and decompression, which can alleviate back pain and improve posture. For example, Supta Matsyendrasana (Reclining Spinal Twist) helps release tension along the spine.
- Muscle Relaxation: Reclining poses often involve passive stretching, which helps to release muscle tension and can be particularly beneficial after a long day or intense physical activity.
- Increased Self-Awareness: Regular practice fosters a deeper connection with the body and mind, increasing self-awareness and promoting a more reflective and contemplative state.
- Improved Digestion: Certain reclining poses, such as Supta Matsyendrasana (Reclining Spinal Twist), can stimulate digestive organs and promote better digestion and elimination.
Practising yoga poses while lying on your back provides a gentle and effective approach to enhancing physical and mental well-being. These poses, such as Savasana, Supta Baddha Konasana, and Supta Matsyendrasana, promote deep relaxation, improve flexibility, and alleviate pain, particularly in the lower back and digestive system.
By incorporating these restorative postures into your routine, you can support spinal health, reduce stress, and achieve a balanced practice that nurtures both body and mind.


